ANKH E1-E4 strategy cards
Because the forums won't let me upload .txt files, I'll cut and paste the contents of the script into these posts. To use, copy and paste these into your own notepad document and save in your scripts folder.
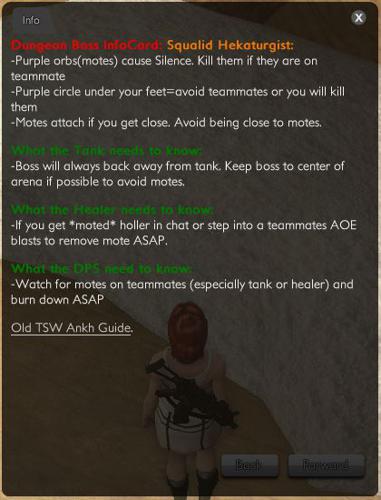
First boss
<a href="text://<font face=LARGE><font color=red face=LARGE_BOLD>Dungeon Boss InfoCard: </font><font color=orange face=LARGE_BOLD>Squalid Hekaturgist:</font><BR />-Purple orbs(motes) cause Silence. Kill them if they are on teammate<br />-Purple circle under your feet=avoid teammates or you will kill them<br />-Motes attach if you get close. Avoid being close to motes.<BR /><BR /><font color=green face=LARGE_BOLD>What the Tank needs to know:</font><BR />-Boss will always back away from tank. Keep boss to center of arena if possible to avoid motes.<BR /><BR /><font color=green face=LARGE_BOLD>What the Healer needs to know:</font><br />-If you get *moted* holler in chat or step into a teammates AOE blasts to remove mote ASAP.<br /><BR /><font color=green face=LARGE_BOLD>What the DPS need to know:</font><BR />-Watch for motes on teammates (especially tank or healer) and burn down ASAP<BR /><br /><a href='chatcmd:///option WebBrowserStartURL "https://lomsglobal.com/threads/ankh-nightmare-strategy-discussion-and-tactics.37/" \n /option web_browser 1'>Old TSW Ankh Guide</a>."><font face=large_bold>Click here to learn how to fight Squalid Hekaturgist</font></a>
This is what it will look like when clicked in chat:
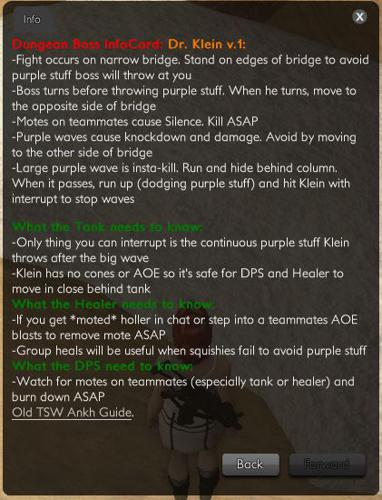
Second Boss
<a href="text://<font face=LARGE><font color=red face=LARGE_BOLd>Dungeon Boss InfoCard: </font><font color=orange face=LARGE_BOLD>Dr. Klein v.1:</font><BR />-Fight occurs on narrow bridge. Stand on edges of bridge to avoid purple stuff boss will throw at you<br />-Boss turns before throwing purple stuff. When he turns, move to the opposite side of bridge<br />-Motes on teammates cause Silence. Kill ASAP<br />-Purple waves cause knockdown and damage. Avoid by moving to the other side of bridge<br />-Large purple wave is insta-kill. Run and hide behind column. When it passes, run up (dodging purple stuff) and hit Klein with interrupt to stop waves<BR /><br /><font color=green face=LARGE_BOLD>What the Tank needs to know:</font><BR />-Only thing you can interrupt is the continuous purple stuff Klein throws after the big wave<br />-Klein has no cones or AOE so it's safe for DPS and Healer to move in close behind tank<BR /><font color=green face=LARGE_BOLD>What the Healer needs to know:</font><br />-If you get *moted* holler in chat or step into a teammates AOE blasts to remove mote ASAP<br />-Group heals will be useful when squishies fail to avoid purple stuff<br /><font color=green face=LARGE_BOLD>What the DPS need to know:</font><BR />-Watch for motes on teammates (especially tank or healer) and burn down ASAP<BR /><a href='chatcmd:///option WebBrowserStartURL "https://lomsglobal.com/threads/ankh-nightmare-strategy-discussion-and-tactics.37/" \n /option web_browser 1'>Old TSW Ankh Guide</a>."><font face=large_bold>Click here for info about Dr. Klein v.1</font></a>
What it looks like when clicked:
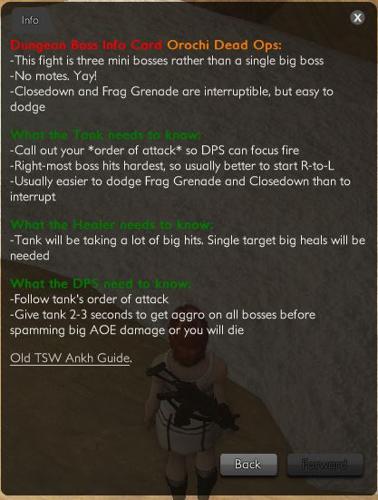
Third Boss
<a href="text://<font face=LARGE><font color=red face=LARGE_BOLD>Dungeon Boss Info Card </font><font color=orange face=LARGE_BOLD>Orochi Dead Ops:</font><BR />-This fight is three mini bosses rather than a single big boss<br />-No motes. Yay!<br />-Closedown and Frag Grenade are interruptible, but easy to dodge<BR /><br /><font color=green face=LARGE_BOLD>What the Tank needs to know:</font><BR />-Call out your *order of attack* so DPS can focus fire<br />-Right-most boss hits hardest, so usually better to start R-to-L<br />-Usually easier to dodge Frag Grenade and Closedown than to interrupt<br /><BR /><font color=green face=LARGE_BOLD>What the Healer needs to know:</font><br />-Tank will be taking a lot of big hits. Single target big heals will be needed<br /><br /><font color=green face=LARGE_BOLD>What the DPS need to know:</font><BR />-Follow tank's order of attack<br />-Give tank 2-3 seconds to get aggro on all bosses before spamming big AOE damage or you will die<BR /><br /><a href='chatcmd:///option WebBrowserStartURL "https://lomsglobal.com/threads/ankh-nightmare-strategy-discussion-and-tactics.37/" \n /option web_browser 1'>Old TSW Ankh Guide</a>."><font face=large_bold>Click here for info about Orochi Dead Ops</font></a>
What it looks like when clicked:
Fourth Boss
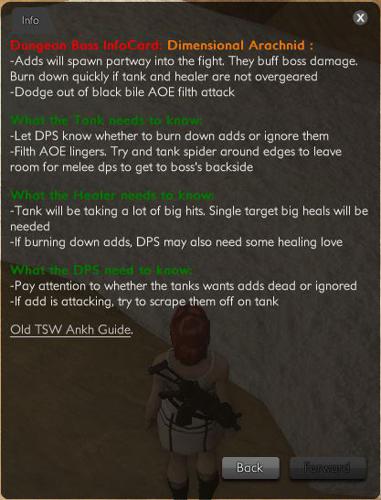
<a href="text://<font face=LARGE><font color=red face=LARGE_BOLD>Dungeon Boss InfoCard: </font><font color=orange face=LARGE_BOLD>Dimensional Arachnid :</font><BR />-Adds will spawn partway into the fight. They buff boss damage. Burn down quickly if tank and healer are not overgeared<br />-Dodge out of black bile AOE filth attack<BR /><br /><font color=green face=LARGE_BOLD>What the Tank needs to know:</font><BR />-Let DPS know whether to burn down adds or ignore them<br />-Filth AOE lingers. Try and tank spider around edges to leave room for melee dps to get to boss's backside<br /><BR /><font color=green face=LARGE_BOLD>What the Healer needs to know:</font><br />-Tank will be taking a lot of big hits. Single target big heals will be needed<br />-If burning down adds, DPS may also need some healing love<br /><br /><font color=green face=LARGE_BOLD>What the DPS need to know:</font><BR />-Pay attention to whether the tanks wants adds dead or ignored<br />-If add is attacking, try to scrape them off on tank<BR /><br /><a href='chatcmd:///option WebBrowserStartURL "https://lomsglobal.com/threads/ankh-nightmare-strategy-discussion-and-tactics.37/" \n /option web_browser 1'>Old TSW Ankh Guide</a>."><font face=large_bold>Click here for info about Dimensional Arachnid</font></a>
What it looks like when clicked:
Fifth Boss
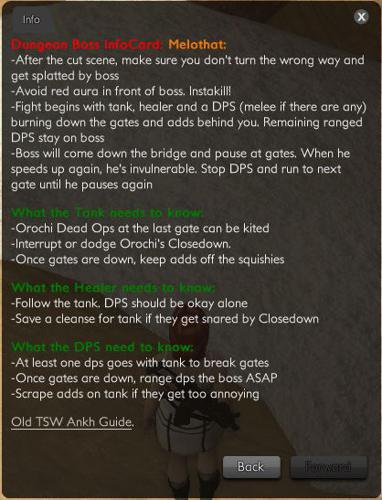
<a href="text://<font face=LARGE><font color=red face=LARGE_BOLD>Dungeon Boss InfoCard: </font><font color=orange face=LARGE_BOLD>Melothat:</font><BR />-After the cut scene, make sure you don't turn the wrong way and get splatted by boss<br />-Avoid red aura in front of boss. Instakill!<br />-Fight begins with tank, healer and a DPS (melee if there are any) burning down the gates and adds behind you. Remaining ranged DPS stay on boss<br />-Boss will come down the bridge and pause at gates. When he speeds up again, he's invulnerable. Stop DPS and run to next gate until he pauses again<BR /><br /><font color=green face=LARGE_BOLD>What the Tank needs to know:</font><BR />-Orochi Dead Ops at the last gate can be kited<br />-Interrupt or dodge Orochi's Closedown.<br />-Once gates are down, keep adds off the squishies<br /><BR /><font color=green face=LARGE_BOLD>What the Healer needs to know:</font><br />-Follow the tank. DPS should be okay alone<br />-Save a cleanse for tank if they get snared by Closedown<br /><br /><font color=green face=LARGE_BOLD>What the DPS need to know:</font><BR />-At least one dps goes with tank to break gates<br />-Once gates are down, range dps the boss ASAP<br />-Scrape adds on tank if they get too annoying<BR /><br /><a href='chatcmd:///option WebBrowserStartURL "https://lomsglobal.com/threads/ankh-nightmare-strategy-discussion-and-tactics.37/" \n /option web_browser 1'>Old TSW Ankh Guide</a>."><font face=large_bold>Click here for info about Melothat</font></a>
What it looks like when clicked:
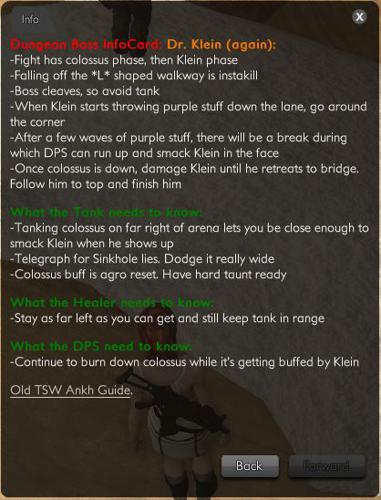
Final Boss
<a href="text://<font face=LARGE><font color=red face=LARGE_BOLD>Dungeon Boss InfoCard: </font><font color=orange face=LARGE_BOLD>Dr. Klein (again):</font><BR />-Fight has colossus phase, then Klein phase<br />-Falling off the *L* shaped walkway is instakill<br />-Boss cleaves, so avoid tank<br />-When Klein starts throwing purple stuff down the lane, go around the corner<br />-After a few waves of purple stuff, there will be a break during which DPS can run up and smack Klein in the face<br />-Once colossus is down, damage Klein until he retreats to bridge. Follow him to top and finish him<BR /><br /><font color=green face=LARGE_BOLD>What the Tank needs to know:</font><BR />-Tanking colossus on far right of arena lets you be close enough to smack Klein when he shows up<br />-Telegraph for Sinkhole lies. Dodge it really wide<br />-Colossus buff is agro reset. Have hard taunt ready<br /><BR /><font color=green face=LARGE_BOLD>What the Healer needs to know:</font><br />-Stay as far left as you can get and still keep tank in range<br /><br /><font color=green face=LARGE_BOLD>What the DPS need to know:</font><BR />-Continue to burn down colossus while it's getting buffed by Klein<BR /><br /><a href='chatcmd:///option WebBrowserStartURL "https://lomsglobal.com/threads/ankh-nightmare-strategy-discussion-and-tactics.37/" \n /option web_browser 1'>Old TSW Ankh Guide</a>."><font face=large_bold>Click here for info about Dr. Klein v.2</font></a>
What it looks like when clicked: